Setting up a wired home network improves internet speed and stability, making it ideal for gaming, streaming, and smart home devices. In this guide, we’ll walk through the step-by-step process of installing Cat6 Ethernet cables through walls and an attic, terminating the cables, and ensuring a clean, professional setup.
Before starting, determine where Ethernet ports will be installed and how cables will be routed through the attic. If possible, run extra cables for future expansion.
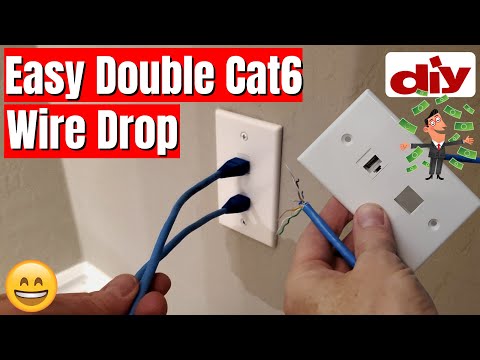
Once the cable is pulled through the wall opening, install the Ethernet wall jack:
After terminating all cables, ensure a clean and organized setup:
Installing Ethernet cables through walls and an attic may seem challenging, but with the right tools and patience, it's a manageable DIY project. A wired network provides faster speeds, better reliability, and enhanced security compared to Wi-Fi. Whether you’re setting up a home office, gaming setup, or smart home devices, wired Ethernet is a future-proof solution.
If you're planning to run multiple lines, always install an extra cable for future expansion. This saves time and effort if you need additional wired connections later.
what's up guys i'm mike and this is the ultimate tech hub on today's episode i want to talk about a difficult installation that most people don't want to tackle nests going in your attic and dropping wires into different rooms i'm talking about cat 6 wires or cat 5e wires so today i'm going to show you how to drop castings wires into a network panel like this then we'll run those castix wires from the attic into a different room down inside a wall now if you're not comfortable going into your attic and crawling around on raptors and you're scared of falling through the ceiling then you may want to hire a professional however if you're not scared of going in your attic and walking around and you're pretty handy with tools then this video is a must watch and guys to make this video easy to follow we'll have it broken down into chapters so you click on the areas you want to watch and guys one more thing during the filming of this video we ended up doing some wire management to make things a little bit prettier a little bit organized so it looks a little different than the last video we did which is the home network tour 2021 but make sure to watch that video because in that video we have all these devices the model numbers and we have all the pricing and where to buy them so let's get started these are the supplies and tools you'll need for this installation first you'll need some cat6 wire or catch 5e cat5e is cheaper i recommend getting 500 feet you also need some rj45 connectors and some boots for the wires you'll need some cat6 wall jacks i bought a five pack and you also need an ethernet wall plate i have a two port because i'm gonna run two wires and we all know two wires are bare than one and some wall anchors to secure the wall plate and just a heads up when you buy our cat6 jacks make sure the color is the same as the wall plate because they do make tan white and blue wall jacks i find matching the color makes it look sharp and professional okay now let's go over the tools you'll need for the installation you're going to need a cordless drill you'll need drill bits and for this install the bigger the better a crimping tool to terminate the network cable a wire stripper a hammer measuring tape a drywall saw [Music] safety glasses a flathead screwdriver and this is a great tool for wire drops the old bolt tied to a string this is kind of an old school way to do wire drops and don't worry i'll show you later just make sure the string is longer than the height of your ceiling so if your ceiling is 10 feet tall make the string 12 feet long you'll need a ladder for sure to access your attic unless your attic comes with a ladder already and mine doesn't and two more things you might need a network cable tester and some tape now my plan is do four wires um two will be for future use so might as well just drop those four in here anyways i'll go ahead and terminate them and i'll just keep them kind of somewhere down here the other two are going to go from here all the way up ceiling up here and we'll come down this wall on the other side where our entertainment center is with our games our tv our media so i'm gonna run it from up top down and i'll go down here at the bottom i'll move everything out of the way and we're gonna have two lines so that's the plan the first thing i did was clean the area so i could access the back of the wall for the wire drop then it's off to the dreaded attic this should be fun or not first thing i need to determine i need to figure out is where i'm dropping the wire through here down the wall i gotta find the cross beam um i'll have to get gloves on to find it to find where that wall is studded should be somewhere around here and then i'll start drilling for the cat6 i'm going to drop two lines you always want to drop two lines when you're doing any kind of wire drops then back there is where the panel is and i'll drop all the wires down that panel should be pretty easy but the hard part is finding in this mess of insulation blowing and insulation it's going to be kind of tough to find it all right i think i've spotted that where i'm going to start my drop it's going to be right over here the first thing we have to do is move the insulation out of the way we need to be able to see what we're walking on so simply move the insulation to expose the raptors i mean rafters you're looking for horizontal two by fours you'll be walking on top of those once i've moved all the insulation out of the way i can now see the location for the wire drop right under the small white wire is the board we're going to be drilling into so at this point you'll need a cordless drill and your largest drill bit for my situation i had to drill through two two by fours stacked on top of each other your situation may be different but the bottom line you want to drill all the way through with a big enough hole so you can feed down two cat6 wires okay just a heads up first thing i did was cut two wires about 80 feet each tape them together and we're going to drop two wires down that hole if you're going to do one just go ahead and do two it's good just in case one wire fails you have an extra one and also it's good for expansion if you want to add more more computers or whatever you want and by taping both these wires together it's actually easier to handle and fish down the wall for some reason the weight of the two wires makes it easier to drop down the wall cavity so keep that in mind and right here is the location of the hole and simply start fishing the wire through the hole and we are good to go so just feed it down as you feed the wire down the cavity of the wall you want to keep feeding that wire until you feel it hit the bottom of the floor once you hit the bottom of the floor stop feeding the wire now it's time to go downstairs and find that wire in the wall we'll then connect the wires to the wall jacks and the face plate and here's the hole where the wires are going down and this is our two port wall plate and we'll install it right over there okay it's gonna go not right here i think my calculations the cable is somewhere around this area here um so i'm gonna put it right here i'm gonna make sure it's lined up the same as over there same height i got some flack last time i did one of these installs and it wasn't the same height so i'll make it the same height all right so behind here definitely stud there here we're good to go so i think it's gonna be right around here is that wire so first thing i want to do is i'm going to put this like this we'll go ahead and drill into here to find that wire i do have a drywall saw which i'll get all right so we're going gonna cut and like i always say less is best when using a drywall saw take your time remove some drywall and only take away what you need to remove and no extra you'll need a big enough hole to grab the wires and also to install the face plate flat against the wall we'll secure the face plate with some drywall anchors right here came up to the top so we're good to go there i want to keep cutting now we need to make sure this will fit flat i can just put this inside like this for now yeah we're going to do that and at this point if you're still watching this video i want to thank you so much i really appreciate it and once you finish watching the video make sure to share this video give a thumbs up and comment and make sure to hit subscribe to keep this channel alive so now it's time to terminate these two wires into these two cat6 wall jack plugs when you buy wall jack plugs it comes with a punch down tool the cast station wall jack plug and a wire cover now i need to go ahead and terminate these into these plugs here so first thing use a wire stripper to expose the wires and then use the white string to pull down another inch to expose the wires just to make sure none of the wires are cut then next go ahead and separate the wires and because the lighting was kind of bad in this corner it was kind of hard to see me wiring these up this is a previous video i did showing the wire color connections so from bottom left is white orange then orange then brown then brown white use that punch down tool to make the connection solid now on the right side it's green green white blue white and then blue once again go ahead and use the punch down tool and go over all the connections one more time and trim off any excess wires then add the wire cover now this wall jack plug snaps right into the wall plate and that's it it's easy next put the face plate on the wall and make sure it's straight and level then get a small drill bit and drill your holes into the drywall then add the drywall anchors and attach the wall plate to the drywall and we're all done now back into the attic and drop the wires into the network panel all right so i'm going to use my good old-fashioned bolt with a string i'm going to drop it through the hole i just drilled over there when i here hit the bottom of the like this it'll hit the bottom of the panel should i'll tie the other end of the string to catch six wires two cat6 and then pull it down through so it's kind of dark back in the area where i'm going to drop this line the panel drop locations in the back very far back with no light so i'll show you the area where i'm dropping the line and then we'll see where the bolt comes out at the bottom i know it's kind of hard to see but those are the wires going down to the panel and we're going to drop that bolt on the string down the hole look i say one thing it's 90 degrees out today and up here like a 110 and for some reason using the string or the bolt on the end always works i don't know why it's better than wires or any fishing tool i guess because the weight of this brings it down and you can hear it from the top your clank when it hits something so it's you know it's gone through and this one all the way down through pretty cool so now let's pull the wires through hopefully we can just pull these wires through and voila we have success everybody clap now thank you so yes i save money i'm not using that 40 tool so i have two wires here i do want to do two more of these but not today it's 90 degrees outside and that adds about 100 degrees so all we have left to do is to terminate these into rj45 connectors and then i'll plug it into my tp-link 8-port switch once again i'll show you a clip from a video that shows how to terminate cat6 cables and we're using the t568b wiring diagram just make sure those wires are flat straight and in the correct order before you put it into the rj45 connector and you will need a crimping tool to complete this process and that's it and this is a time lapse of our rewire of our network panel and guys i want to encourage you to visit my patreon page where two dollars a month helps keep this channel going and for every new member i'll do a personal shout out on the very next video all right everyone we're all done our panel is rewired much more organized we've added two new cat6 lines that go to our media room we now have two fully functional cat6 wall jacks in our media room well everyone we're all done here and as usual i want to thank you so much for watching and make sure to leave some comments below if you have any questions or suggestions and guys remember if you like this video give a thumbs up and share it if you love it hit subscribe to keep this channel alive thank you again for watching i really appreciate it have a great day

Welcome back to The Ultimate Tech Hub. On today\'s 200th Episode Celebration, we tested the Rock Space Whole Home Mesh ...

Best Home Networking Cable in 2022? Which Network Cable is better for your Home or Office? Is it Cat5e or Cat6? Watch this ...

Get Faster Internet Speeds When You Change 1 Thing! On today\'s episode we will install Cat7 into our Home Network to see if we ...
If you\'re considering buying or installing Cat7 into your home network then watch this video first! Peace. High-Quality Cat6a and ...

Welcome back to The Ultimate Tech Hub. On today\'s episode we will show you how to make a Cat6 Crossover Cable. We will ...

Hi everyone and welcome back to Ultimate Tech Hub. On today\'s episode we will show you what need in your Network Tool Box ...