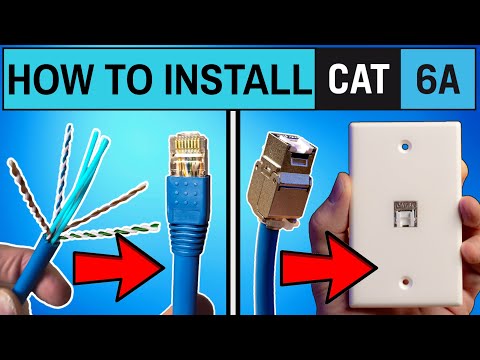
Installing Cat6a cables in your home or office network can boost speeds up to 10Gbps. This guide will show you how to terminate Cat6a cables and install keystone jacks with step-by-step instructions and useful tips.
| Feature | Benefit |
|---|---|
| 10Gbps Speeds | Perfect for high-speed internet and data-intensive tasks |
| Enhanced Durability | Thicker cables provide better shielding and reduced interference |
| Future-Proofing | Compatible with modern networking equipment and standards |
With these easy-to-follow steps, you can successfully install Cat6a cables and keystone jacks for a faster and more reliable network. Whether for home or office use, Cat6a is the ideal choice for future-proof networking.
installing cat 6A into your home network will give your networking speeds a 10 gig boost these are the two installations you'll need to learn before you install cxa into your home network and guys before we get started make sure to like share and subscribe it's completely free and if you're already subscribed high five thanks all right these are the two cat 6A installations you'll need to learn and both installations will only take minutes to do the first installation is how to terminate cat 6A cables the easy way and the second installation is how to install cat 6A wall jack plugs the easy way and all tools and supplies are listed below in the video description with all the best prices all right guys first installation how to terminate cast 6A cables all right these are all the supplies and tools we're going to need to terminate the cast 6A first you're going to need some cat 6A probably not 1,000 ft but you could probably buy 500 ft or 250 ft of this and this is cat 6A UTP unshielded twisted pair so the tools you'll need for this job are a wire stripper wire cutter you'll need a crimping tool so make sure this is the cat 6A cat 7 crimping tool because the cat 5e will not work should say right here and it does also you'll need some connectors these are the traditional C 6A premium connectors and these are the pass through connectors we're going to use these today because this is a pass through crimper I can't use these on this one because it'll actually just break break the end of it and since we're using UTP which is unshielded twisted pair there is no ground wire in here or any foil so let me show you what this looks like I'll go ahead and uh show you how to use a stripper you see the blade right there put it in like right here and you want to turn it and then it'll break it like that and then after you break just pull it off and let me show you how this looks as you can see we have the traditional four four pairs the green blue brown and orange this is the center core and once we we have to snip this off when we do the termination one thing to note about this this is the easiest of the C 6A types to install and with cat 6A it's very thick and rigid and it's tough to bend and Cat 6A is definitely harder to terminate than cat 5e or cat 6 Riser cable also one more thing to note is that these wires you have a green right here but this white does not have the white green on it so make sure once you untwist these you kind of keep them segregated together otherwise you're going to get them mixed up so just keep that in mind when you're terminating these cables so yeah that's it this is unshielded twisted pair okay the first thing we're going to do is untwist all four pairs and then we're going to straighten them out that way we can easily get these wires into the t568b configuration and the best way to do this is to use the Old Wire cover that we removed earlier this technique makes untwisting the wires and flattening them really easy it also saves your thumb and fingers from getting sore and guys don't forget hit subscribe is totally free so once you unravel all four pairs and get them straight as possible and flat as possible it's time to trim off that inner core remove all three plastic pieces as flush as possible now it's time to line up the wires in the t568b configuration it goes white orange orange white green blue white blue green white brown brown now trim off the wires straight as possible and I think these wires look pretty good now insert all eight wires carefully and slowly into the pass through connector once the wires come out the other end make sure to check the colors to make sure they're all correct because cat 6A cables are very thick we need to kind of mash the end down a little bit to allow the blue cable cover to go inside the connector a little bit so use this part of the crimping tool to help flatten that part out a little bit and then we can slide the blue part of the cable inside the connector now it's crimping time insert the connector all the way into the crimper and then simply press down we he kind of a snap and then pull it back out and check your work looks really good and lastly put that boot cover on looks really good so if you plan on terminating shielded cat 6A you have to use these connectors this connector has that clamp or that ring that wraps around the cable and secures the ground wire to that clamp and these connectors also have a load bar you would simply insert the wires into the load bar and then insert the load bar into the connector and these are the cat 6A premium connectors they also have a load bar as well but no grounding bracket and let me know in the comment section below if you want me to make a video on how to terminate shielded cat 6A using that ground wire if I get a large response in the comment section then I'll make that video all righty the second installation is how to terminate cat 6A wall jack plugs so let's take a look at the cat 6A wall jack what you get is the C 6A wall jack get the C that goes on top and you get a zip tie and that's it and of course this does come with the instructions as well as the wiring diagram and we're going to use the t568b configuration so let's get started oh and guys don't forget to like share subscribe and comment it really helps the algorithm thanks so here are the supplies and tools you're going to need for this installation and everything is listed in the description below so first you need to strip back about 2 in of the protective sheath of the ctica cable next you want to reveal all the wires then cut off this plastic inner core we have three so there are two installation options a toolfree option or a crimp tool option we're going to show you how to use the toolfree option it's the easiest for the toolfree option we're going to use this white wire cap it's already color coded for the correct wire configurations and it has both A and B and we're going to use B so after you slide The Wire through the cap simply match up the wire colors to the color codes on the cap so at the bottom it goes white blue blue white green green remember cat 6A copper cable does not have the typical white blue it's just white as you can see right here at the top it's white orange orange white brown brown make sure the wires are seated all the way down and trim off any excess wires after you trim off any excess wires will connect the cap to the wall jack it simply snaps on you want to press the wire cap as far as it can go and then you want to close the hinge door now this takes some strength the hinge door has to snap all the way closed then once it's snapped closed use the provided zip tie to secure the wire to the keystone jack then next connect the wall jack to the wall plate it simply snaps in and now we can plug a cat 6A cable into the wall jack and you probably noticed the cat 6A wall jacks have a hinged door on the front but don't worry just snap in the cat 6A and you're all good and now you have a 10 gig connection coming out of your wall jack pretty cool all right guys now that you learn these two cat 6A installations make sure to check out this video right here home networking bill guide 2024 and with that guys make sure to like share subscribe and comment and for God's sakes smash the Bell icon and I'll see you in the next video real soon high five peace

Welcome back to The Ultimate Tech Hub. On today\'s episode we will show you how to fix a slow ethernet connection. This works ...

Welcome back to The Ultimate Tech Hub. On today\'s 200th Episode Celebration, we tested the Rock Space Whole Home Mesh ...

These are our TOP 5 BEST Wireless Gaming Router\'s for 2024 and going into 2025! Product links are listed below. Please ...

This is the "Easy Ethernet Wall Jack Installation" that uses a 45-degree Cat6 Keystone Jack from SatMaximum. These 45-degree ...

RJ45 Load Bar Benefits! 5 Reasons to use Load bars! Cat6 Connector RJ45 Connectors 100pcs UTP with Load Bar ...

These are our TOP 5 BEST Mesh Wireless Router picks for 2024! Product links are listed below. Please subscribe and ring the ...