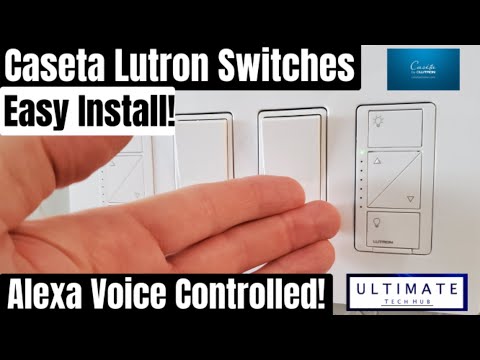
hi everyone I'm Mike and this is
ultimate tech up this is episode two of
home automation and we will look at a
set of smart dimmer switches and plugs
for Lutron we will first install
hardwired dimmer on a three by switch
and then most all to plug in dimmers of
control two lamps in two different rooms
then we will show you how to use a
remote in the Lutron app and lastly how
to set of voice commands with the Alexa
app and if you missed episode 1 of home
automation the Roomba 6/10 review will
be a link at the end this video if you
like these videos give a thumbs up and
if you love them hit subscribe first
thing to do before installing the wired
dimmers to cut power to the switch so
will look for their breaker label entry
where we install the dimmer here we go
the left if a cassette a dimmer are
installed for our kitchen on the left on
the right who have installed a dimmer
for the entry lights the cassette a
wireless dimmer is priced at $59.99
cassette at dimmers are compatible of
LED incandescent and halogen bulbs
[Music]
remove the wallplate next remove the old
switch simply remove the two screws
holding switch to the wall box
[Music]
let's move the new dimmer from the
packaging
we have a dimmer three wire caps and two
screws and the instructions next remove
the gold ground wire that's connected by
a screw use that Phillips head
screwdriver to unscrew it now simply cut
the other three remaining wires loose
with wire cutters next strip back the
red and two black wires that a core of
an inch you can use wire strippers or
just regular scissors I prefer good
old-fashioned scissors
now it's time to wire up the new switch
first connect the green wire to the gold
ground wire twist the yellow cap
clockwise until it feels tight
next connect the red wire to one the
black wires twist the yellow cap
clockwise until it feels tight
[Music]
lastly connect the three remaining black
wires together twist the yellow cap
clockwise until it feels tight done
gently push the dimmer switch into the
wallbox make sure the wires have enough
space behind the switch so the
connections do not come apart or get
kinked up once the switch is able to sit
flush into the wallbox use the two
screws to finish the install let's split
the wall plate back on and see if it
sits flush with inter switches it
doesn't so we'll make an adjustment with
a screw will loosen a little bit and see
if that works
put the wall plate back on see still not
flush loosen the two screws a little use
wire cutters or pliers to remove the
three silver tabs on the right side that
dimmer this is probably causing the
dimmer to be off and not sitting flush
with the other switches retighten the
two screws install the wall plate
perfect go back to the breaker and push
it to the right turn it back on let's
test the new dimmer switch first tap the
off button
success next tap the on button success
now use the dimming button to dim the
lights
and that works too now screw in the
screws to the wall play if you like
these videos please hit the subscribe
button it keeps this channel going and
it's a really important next let's
remove the plug-in dimmer and remote
from the box
the dimmer with the two outlets and
their low control for the dimmer now
let's set the dimmer in the master
bedroom we will control both lamps with
a dimmer choose a plug-in location near
both lamps and will need an extension
cord for this setup this is the plug and
location for the dimmer plug in the
first lamp the lamp will require
extension cord just run it behind the
bed push the nightstand back and plug in
the extension cord done let's test the
remote now make sure both these lamps
are turned on otherwise it won't work
and the remote works perfectly
I'm going to set up one more plug-in
dimmer and then I will show you how to
use the app on your phone to control all
the dimmers you just installed before we
set up the app and also the voice
control with Alexa when you install a to
set a wireless smart bridge now I'm
gonna start the smart bunch of Pro which
is $100 but the regular smart bridge is
about 80 simply put it in your network
box or near your router plug in the
power plug in Ethernet to the bridge and
plug it into your switch or your router
it's that simple and the great thing
about the smart bridge or the smart
bridge Pro is you can connect up to 75
devices which is plenty for any sized
house next thing you want to do is
download the dilute Ron app from the
Play Store launch the app you can see I
have two devices already set up the
kitchen and living room let's add a new
device choose the product you want to
add let's start with a wired dimmer in
the entryway first
to pair the new switch hold the button
to bottom button for 10 seconds it's
ready choose for your entry front foyer
and choose ceiling lights next success
now let's add the other two dimmers
choose a product and learn choosing
plug-in dimmer this time now hold the
bottom button down for 10 seconds again
choose nook table lamp and two lamps
next
success let's add one more the master
bedroom lamps down choosing plug-in
dimmer hold the bottom button down for
10 seconds
choose master lamps 2 lamps now let's go
ahead and set of voice commands through
the Alexa app go ahead and open that up
on your phone go to menu and go to
skills and games skills and games you
like apps for Alexa and the search bar
you're gonna want to type in Kissena or
Lutron you know seek Isetta and ra2
that's the one you want to download
don't download the blue trunk connect
app that will not work
[Music]
ok scroll down you'll see three examples
voice commands Alexa turn on the living
room lights Alexa dim the bedroom lights
and Alexa set the kitchen last 80
percent it's pretty cool there's a lot
more you can do next let's go to add
device I'm gonna go to switch and Lutron
and discover devices it takes about 45
seconds will speed that up though and
they found two scenes all right let's go
to switches and you can see all our
switches we can turn them all on if
you'd like and by clicking on each one
and you can turn them off at the very
top if you want you can hit all on or
all off either way next let's go to
routines now let's check out it likes a
good morning routine I like that one so
in the morning you wake up but like I
said good morning you'll see what it
does the Nook the foyer and liberal lamp
kitchen lights will all turn on there
see percentages a brightness even
temperature will kick in for a living
room and for the office and for the
master bedroom and let's add in actions
go ahead and go to smart home lights and
let's go ahead and go to see the front
for your main light let's go and do that
hit next and power you can power off or
power on and we can adjust the
brightness all the way up or even down
to 40% or 40 whatever you want to do
[Music]
next you hit next and now we can see it
there I already had it set below so I'll
go ahead and get rid of that one yeah
there we go well I thank you guys for
watching my videos if you like these
videos give a thumbs up if you love him
his subscribe it's free and hit the bell
icon so you can be notified of future
reviews and tech videos thank you again
for watching
[Music]
Alexa good morning
[Music]
[Music]
[Music]
[Music]
you