Installing a coaxial wall plate is a simple way to create a clean, professional cable setup for your TV or internet connection. This guide walks you through the tools, stripping process, and mounting steps.
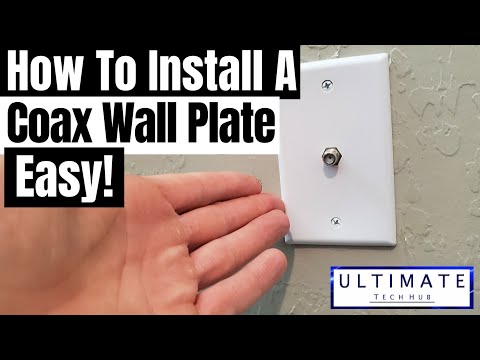
Installing a coaxial wall plate is a quick and cost-effective way to improve the aesthetics of your home cable setup. With the right tools and careful preparation, you can achieve a professional-looking installation.
hi everyone this is Mike from ultimate tech hub today you install new collects wall plate first let's take a look at the required parts and tools all of which can be purchased at Home Depot or Lowe's first only a new coax wall plate which cost about three dollars next you let need an f-type connector you get ten pack for about ten dollars next a coax cable stripper a coax cable cutter and a coax compression tool and a cordless drill or screwdriver and remember if you liked this video give a thumbs up and share it if you loved it hit subscribe it's free you could purchase each of these tools separately which would be more expensive I recommend buying the coax cable hip kit for 42 dollars save some money ok let's get started first use the cable car to make a clean cut looks great next use the coax cable stripper place the coax into the cable stripper and add a small amount of pressure while spinning the cable stripper after a few spins remove the cable now remove the silver metallic shield it's very crucial to remove as much of the shield as possible this is the most important step because the cost will not sit flush inside the connector if the metallic shield is in the way once the shield has been removed we can attach the f-type connector now push the coax cable into the connector push the connector as far as possible until you see the center core and a dielectric insulator next take the COAS compression tool and place the f-type connector into the tool [Music] right here the center core should go inside the black compressor next make sure the cable is secure and then use the black handle to finish the job press down hard and that's it done perfect now push most aquila back into the wallbox next screw the quest cable to the connector on the new coaxial wall plate I have a bracket that needs to be removed before I can finish the install your wall box may not have this bracket so skip this step if you don't have it now screw the new wall plate and done I want to thank everyone for being a part of the ultimate tech hub team and if you haven't subscribed yet please do it's free and if you like this video give a thumbs up and share it thank you again for watching [Music]

This is the complete TP-Link Omada Switch setup guide for Home Networks or Small Businesses. TP-Link sent us the Jet Stream ...
Create Windows 10 Installation Media - Link: https://www.microsoft.com/en-us/software-download/windows10 You need a USB ...

How To Wire Up Ethernet Plugs The Easy Way (And The Professional Way!) Have you ever wondered which RJ45 Connector you ...
Welcome back to The Ultimate Tech Hub. On today\'s episode we are going to show you "How To Wire Drop 2 Cat6 Cables" using ...

On today\'s episode we are installing a 16.4 ft. Govee LED Light Strip behind our YouTube Studio Desk. We are replacing an OLD ...

How to Install Cat8 Plug and Cat8 Keystone Jacks. This is the easiest way to install cat 8 into your Home or Business Network.