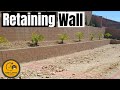
so we decided to build a retaining wall
in our backyard
this retaining wall is about 75 feet
long and
two two and a half feet tall it will
essentially match the other retaining
wall behind it
let's get started so we'll need some
access to the backyard
for the excavator
so once the excavator got to the
backyard
it began digging for the footing so the
technique is
to remove some more dirt maybe another
four or five inches from the back
then afterwards come back and dig about
a six inch
trench that runs the entire span of the
retaining wall
it will be six inches deep and two feet
wide
which is plenty of room for the rebarb
the rebarb is placed in the trench
to provide added strength for the
concrete footing
okay we're all done with the excavator
[Music]
so after having the footing dug with a
machine
they added rebarb and then concrete
and here's the rebar they installed that
runs about
75 feet
[Music]
the concrete mixer would not fit in our
backyard
so they attached a long hose and just
pumped it in
so the company that we used to build our
retaining wall
is silverstone contracting incorporated
and the owner
is corey westover his company is in las
vegas
we are not endorsing any company however
corey and his crew did a great job
and if you live in las vegas and you
need a retaining wall
give corey a call for a free estimate
we'll put his contact information
in the description below so after the
concrete is poured
they lay the first set of bricks into
the wet concrete
when setting the first layer of bricks
it's very important to get them level as
possible if that first set of bricks is
not level
[Music]
then the rest of the wall will not be
level
it was really fun watching these
masonry's work
it's almost like an art form so after
they get that first layer of bricks
set in the concrete they then start with
the corners of the wall
they're going to start with the right
side that corner first
and they're going to build it up all the
way to the fourth layer
then they're gonna go to the left side
of the wall and do the same thing
build it up to the fourth layer this was
day one so once the corners were done
to let that dry overnight and come back
and finish the wall the next day
so between the first and second layer of
bricks
they drilled holes and added pvc pipe
and they spaced these about 8 or 9 feet
apart
these holes are designed for drainage
for the back of the wall
and remember to hit subscribe to keep
this channel alive
do
[Music]
okay this is day two and they're
starting the second layer of bricks
and if you look closely you can see
those holes where the pvc pipe is
like i said that's for the drainage
[Music]
and now we're onto the third layer of
bricks
the wall is starting to take shape and
it looks really good
and this wall will match the back walls
probably look even better
[Music]
okay now only a couple more bricks and
we're done
looks great
now to waterproof this wall they coated
the back of the wall
with a black tar
they also added a plastic bib that ran
the span of the wall
and then they placed rocks on top of
that bib
this allows for drainage
then after they left i took my shovel
and just back
filled the wall i had a lot of dirt from
that slope
that i could put into the backfill
this took about two days mainly because
it was very hot
after waterproofing and backfilling the
wall
we added some nice decorative plants and
irrigation
then we added rocks that match the rest
of our landscaping
and the rock we used is three quarters
vista gold
this process took one day to complete
now we're all done and once again i want
to thank you guys for watching
and remember if you like these videos
give a thumbs up and share it
if you love them hit subscribe it's free
[Music]