Cleaning up messy ethernet cables is essential for a professional-looking home or office network setup. This guide will show you how to install a 6-port data wall plate step by step, ensuring a clean, organized, and efficient wiring solution.
Select a spot between an electrical outlet and a wire drop to mount the data wall plate. Before cutting into drywall, use a stud finder to ensure no electrical wires or plumbing are behind the wall.
To wire the ethernet cables into wall jacks:
To ensure a professional look:
Installing a 6-port data wall plate is an easy DIY project that significantly improves the organization of your ethernet cables. With proper wiring and placement, your setup will look clean and function efficiently.
Let’s talk about how to install a 6-port data wall plate to clean up messy ethernet cables.
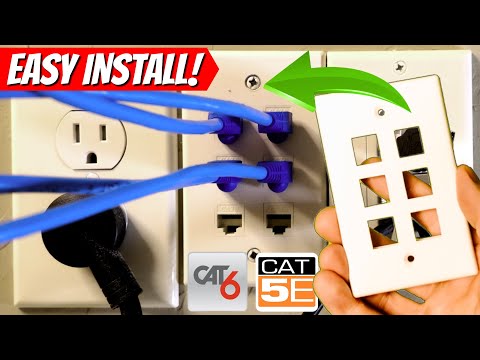
Behind our fireplace, we had multiple ethernet cables coming out of the wall with no organized connection. To fix this, we installed a 6-port wall plate.
Tools needed:
First, we selected the installation spot and cut a hole in the drywall using a low-voltage gang bracket as a guide. Always ensure there are no wires or pipes behind the wall before cutting.
Next, we pulled all five ethernet cables through the hole and terminated each into a wall jack following the T568B wiring standard. A punch-down tool secured the wires into the slots, and we clipped the excess.
After all jacks were wired, we snapped them into the 6-port wall plate and screwed the plate onto the bracket. The final touch was adjusting other faceplates for a level, professional look.
Final Thoughts: This installation provides a clean and professional way to manage ethernet cables, ensuring better organization and easier troubleshooting.
Thanks for watching! If you found this guide helpful, be sure to like, share, and subscribe for more home networking tips.

Cat 8 or Fiber for your Home or Business Network? Best Deals On Cat 8 and Fiber Cables: Cat 8 Ethernet Cable 50 ft,1.5ft 6ft 10ft ...

How to wire up Cat6a UTP the easiest and best way! This is a detailed "How-To" video on Cat6a Unshielded Twisted Pair ...

On today\'s episode we will show you how to install a 2-port Cat6 Network Faceplate and a Low Voltage Gang Bracket. We will ...

Wi-Fi 7 Speed Test! ASUS Zenbook versus TP-Link GE800! How fast can it go? ASUS Zenbook - https://amzn.to/44rHiaC ASUS ...

Do You Want Faster Wi-Fi? 5 Easy Tips! My Amazon Store ( My Favorite Tech! ) https://a.co/d/0dOzp8yE Support the Channel!

These are our Top 5 Picks for Home Networking Switches in 2024. All Network Switches are under $200 and some are as little as ...